Combat Stats List
Here is a list of the character statistics I have written about. Unlike other guides I’ve started with this one open as you may be looking for specific information. With each number, I’ll copy the official description from in-game, then provide my explanation on it!
Note: if you notice any errors or have additional input, please let me know! If I incorporate your advice, I’ll credit you. Let’s make it as useful a post as possible, as a community for the SWTOR community!
Let’s dive in.
Offensive / Attacking Combat Stats in SWTOR
All characters, regardless of class need to deal damage. In Solo play you have little-to-no choice and in group content, you should be trying to damage enemies in between healing your allies. Here’s a rundown of the main attacking combat stats in SWTOR:
Accuracy

In years gone by, most classes started with 90% accuracy. The exception to this were the Force Tanks who started with 110% accuracy. I don’t know about non-Forcies as I’ve never had a non-Force tank. However, SWTOR adjusted this quite some time ago so everyone else started with 100% Accuracy Rating.
Accuracy: Chance that an attack will successfully hit the target. Accuracy over 100% reduces the target’s defence.
So, when accuracy started at 90% there was a 10% chance you would miss the mark regardless of the enemy’s own statistics. Now, your offensive skills will at least be on-target. If you have more than 100%, there is an increased chance that an enemy will not be able to dodge, deflect or parry your abilities.
Should I Increase My Accuracy Rating?
For tank and healing classes, the answer is “never”. You can’t miss your ally if you’re healing them!
In reality, unless you’re doing Operations (and potentially PvP) you should ignore accuracy altogether. From my understanding, DPS classes should aim for at least 110% accuracy for Operations. This is linked to the need to deal as much damage as possible on Bosses, as far as I understand it. But for solo content, you’re better putting your focus on any other stats.
More on Accuracy
Having 100% or even 110% Accuracy does not mean you cannot miss. It’s easy to forget that enemies also have their own stats. Their Defense Chance may be strong, meaning they have a chance of dodging or parrying your attacks.
If you want to dig deeper into this, the Dulfy has a detailed guide on how accuracy, and other stats work. But hopefully my summary is still helpful!
↑ Stat List
Alacrity

Alacrity: Increases the speed at which abilities are executed.
While this description is fairly self-evident, it is also incomplete. Yes, your combat abilities are quicker (in terms of those with channel times) when your Alacrity Rating is higher. But it also has other effects:
- Reducing cooldowns of certain combat abilities
- Improves regeneration of Force Power, Energy and Cells.
- Speeds up damage-over-time (DoT) and heal-over-time (HoT) abilities
- For Bounty Hunters, it also has an impact on Heat Dissipation Rate. However, see the paragraph below on this one.
Should I Increase My Alacrity Rating?
This answer to this depends entirely on your class and your role in group combat. If you do not take part in group Flashpoints or Operations, this is simply a personal choice depending on how you want to play.
- Healers: I would say in almost all cases, if you have a healing class, you should improve your Alacrity. A Guild-mate suggested that at least a 10% Alacrity Rating should be aimed for by L70. Your ability to heal fast enough depends on your ability to regenerate your resource bar (Force Power, Cells or Energy). If you have no power, you cannot heal. And healers need to react quickly. I would suggest, even if you only do solo content, with a companion on Tank/DPS mode, then you should improve your Alacrity Rating as you level.
- DPS: A higher Alacrity Rating enables you to deal damage quicker. That’s the very definition of a DPS role: dealing as much damage as possible in as little time as possible. But I struggled on my Mercenary when I had a high Alacrity. You may not have such difficulty, but see my challenges below!
- Tanks: No. You should be focussing on other stats – Defense Chance, Shield Rating, Shield Chance & Absorption.
What’s the Thing with Bounty Hunter Alacrity?
Believe it or not, years ago, I did the occasional raid with my guild. At that time I thought I needed more Alacrity on my Mercenary – dealing more damage quicker with a slightly quicker Heat Dissipation Rating. Except I overheated during long fights in the last operation I did. Why?
Your gain in Heat Dissipation rating does may not outweigh the heat you generate by doing more damage quicker. The important word is “may”. I did not learn this through my own intelligence – ha! If only! No, a gentle prod by a friends pointed this out to me.
A Choice of Rotation
A rotation in combat refers to the order you trigger various combat abilities while fighting. So my issue may not have related to my Alacrity at all.
I found a suggested Arsenal Mercenary Rotation here. If you have advice on this please use the comments while they’re open!
What I Chose
In the end I reduced my Alacrity to under 10% and re-channeled these into Power and Critical Rating. I’ve not had overheating problems in longer Solo fights since. However this may (or may not!) have been correct. Players offered me their advice in this Twitter thread.
[tweet id=”1149315901566726144″ align=”none”]
↑ Stat List
Bonus Damage & Healing

Bonus Damage: Damage added to the basic melee/ranged attack. Powerful attacks (Critical) gain a larger multiple of this damage.
Bonus healing is almost the same except it adds to the basic healing amount, where Critical rolls heal a larger multiple of this number.
Bonus damage is a stat that you can’t increase independently. However, it is calculated from other stats that you can improve:
Bonus Damage & Healing Differences
According to a complicated (but excellent) post by Rambol, the bonus damage/healing from Mastery and Power is linear. This means each increase in Mastery or Power has the same increase in Bonus Damage/Healing.
However, there is a slight variance when you split Bonus Healing from Bonus Damage. It seems that the bonus to healing is less than the bonus to damage.
Should I Increase Bonus Damage/Healing?
The short answer is: by working on your other stats, you will increase Bonus Damage/Healing by default. How you go about that will depend on your priorities when gearing up.
↑ Stat List
Critical Chance & Critical Multiplier

Critical Rating (Chance): Chance that a successful (Melée/Ranged) attack will deal critical damage…or land a critical heal.
and
Critical Multiplier: Critical hits or heals increases damage done or health restored by this percentage.
This combat stat is, erm, critical if you’re a DPS or a Healing character. Critical Chance is a probability rolled each time you use an ability. If the dice roll in your favour then that ability will deal more damage (or heal more health) than a normal, non-critical hit. On that basis it is more helpful to use the term Critical Chance than Critical Rating.
However, note: you cannot increase these two combat stats independently. They are both increased by improving a single Critical Rating. The distinction is simply helpful in calculating your effective bonus damage or healing when rolling a critical hit or heal. Hope that makes sense!
How to Improve Critical Chance
There are a few stats that filter into critical chance:
- Critical Rating: that may sound obvious, but it’s still true. Items of gear, or upgrades to Enhancements (available from vendors across the game, and always on Fleet) can include Critical Rating improvements.
- Mastery: Improving your ‘main stat’ of Mastery also boosts your critical chance.
- Buffs: This could be in the form of class buffs (e.g. Imperial Agent’s Coordination buff). Or if you use stims that grant Mastery then you’ll see a temporary increase in your Critical Chance.
- Abilities / Certain Gear: any abilities that buff critical rating or Mastery will also increase your Critical Chance.
A simple example of an item that gives you a temporary buff are the Relics you can craft or earn from quest rewards.
Simple Relic
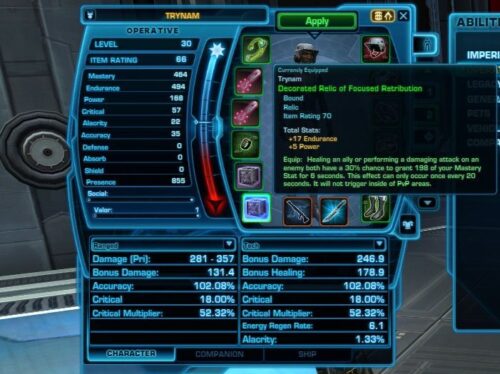
This Relic of Focussed Retribution (tap it to view it full size) has the tooltip of:
Healing an Ally or performing a damaging attack on an enemy both have a 30% chance to grant a bonus to Mastery of 198 for 20 seconds.
So each time you successfully hit a foe, or heal a friend, you may get a temporary buff to Mastery. This in turn will, for the duration of the effect, boost your critical chance (but not Multiplier – see below).
Calculating Critical Chance
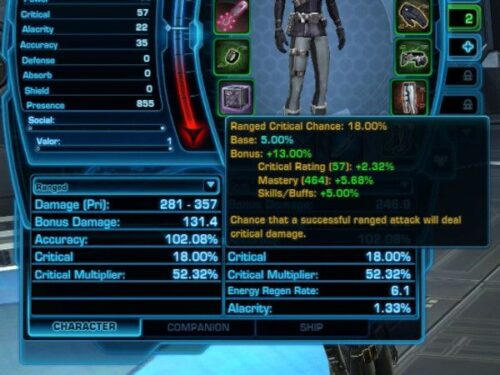
Take this example from my Level 30 Lethality Operative:
- Base: a pre-assigned baseline you have no influence over – 5%
- Bonus from Critical Rating (Gear): 2.32%
- Bonus from Mastery (Base + Gear): 5.68%
- Class Buff: 5%
- Total: 18%
So I have an 18% chance when activating a combat ability to land a critical hit. Or if I’m healing myself or my companion 18% of a critical heal.
How to Improve Your Critical Multiplier
Quite some time ago you had to choose to upgrade chance and/or multiplier, much as you have to do now for Shield Chance and Shield Absorption. However you just have to worry about the one stat where Critical Rating is concerned. Critical Multiplier is calculated after critical Rating. So anything you do to improve Critical Rating will also increase Critical Multiplier. In the example of my Operative above:
- Base: 50%
- Bonus from Critical Rating: 2.32%
- Total: 52.32%
Although it’s purely an academic exercise, it’s helpful to note that increasing your Mastery stat does not change your Multiplier number.
Critical Multiplier & Bonus Damage Healing
In the section on Bonus Damage & Healing it was said that critical hits/heals use a larger multiple of this number.
- So by increasing Mastery and Power you increase the base number of bonus damage/healing
- By increasing Critical Rating, you improve how much extra damage or healing you do based on that baseline.
Should I Increase my Critical Rating & Multiplier?
If you are playing a DPS or Healing character then you absolutely should. More critical hits means your enemy dies quicker. And if you combine a solid Critical Rating with a high Alacrity Rating, then you’ll heal more, or deal more damage, quicker too.
Tanks can ignore this stat in favour of Defensive Combat Stats.
↑ Stat List
Mastery

Mastery is the primary stat for all classes and so impacts your combat effectiveness. Increasing your Mastery improves:
Should I Increase my Mastery Rating?
To answer this, let’s look at Talitha’koum, my Sith Sorcerer Healer, who’s done all Solo content to date. I’m only T2 in Galactic Command terms however. If you want to see the techy maths stuff, tap the link below!
Critical Rating Impact
- Mastery: 6407
- Impact on Critical Rating: 11.48%
- Contribution: 0.0018% (i.e. not much!)
If you compare it to Critical Rating, however, where each point of Critical Rating gives about 0.01% critical chance. So if you’re deciding whether more Mastery or more Critical Rating, the latter wins every time. That should not be a surprise!
Bonus Damage
- Bonus Damage (Melée): 2180
- Mastery Contribution: 1281 – each point of Mastery gives about 0.20 points to Bonus Damage.
- Power Contribution: 794. Talitha has 3454 Power, so each point of Power gives about 0.23 points to Bonus Damage
So in this case, if you have to choose between Power and Mastery, Power also wins out.
Bonus Healing
- Bonus Healing: 2425
- Mastery Contribution: 897, so each point of Mastery gives 0.14 points to Bonus Healing.
- Power Contribution: 587. As earlier, we had 3454 Power, so each point of Power gives about 0.17 points for Bonus Healing.
So again, for the Force healer, focussing on Power has a greater impact on your bonus damage and healing than Mastery. So, in this case, choose Power over Mastery.
Which Stat to Prioritise?
From my investigation, if you’re deciding whether to increase Mastery or Power more, choose Power every time. And the same applies to Critical Rating too. As both of these stats affect DPS and Healing, you should be safe applying this logic to either role.
There is likely an “accepted priority” for these stats, but I would suggest the following. As your Mastery will increase as you gear up anyway, I will risk advising not to focus on Mastery. Therefore my priority order for DPS and Healing classes is:
I’ll cover Tanks in the section on Defensive Stats.
Opinion: Focus on Power or Critical rather than Mastery
The article from Rambol points out that both Mastery and Power increase damage in a linear fashion. There are no diminishing returns. So the maths is the same as you gear up. So, finally on this point: if you’re modding your gear or adding augments, I would say not to use Mastery ones if you can avoid it. If Mastery comes with a stat you’re working on then that’s a bonus!
↑ Stat List
Power

You’ll be glad to know that we’ve covered most of this in the sections above!
Power increases damage and healing bonuses added to abilities.
Therefore Power increases Bonus Damage & Healing. In case you came straight to this section from the top of this guide, you should also see the Mastery section.
Should I Increase my Power Rating?
For Healers and DPS characters, the answer is yes. If you’re a tank, however, you should continue reading as you have higher priorities (at least in my opinion!).
↑ Stat List
Defensive Combat Stats in SWTOR
Now we’ve worked through the attacking stats, let look at your defences. Some of these apply to all classes and some are predominantly the domain of Tanks.
Armour

Armour reduces the amount of damage taken by kinetic and energy attacks.
To explain this to beginner (and maybe some more-experienced) players of SWTOR, you need to understand attacks. If you don’t want to think too deeply, don’t tap the link below!
A summary is: Armour does not protect you against poisons or Force mental attacks (for example) or fire damage. But you are protected from other, more-physical forms of attack, Lightsaber blades and blaster/rifle/cannon bolts, by your Armour Rating.
Kinetic Damage
A kinetic attack is a physical one: a bladed melée weapon attack, a kick in the face, a punch in the face and any other attacks like this. It’s also important to note that some Force abilities are also kinetic: e.g. the Jedi Shadow abilities Slow Time, Force Slow and Force Stun.
A weapon such as the Cathar Warstaff and knives for Agents/Smugglers deal kinetic damage rather than energy damage. But check the weapon tooltip to be sure.
Energy Attacks
Energy Attacks are those such as blaster, rifle or cannon shots and Lightsaber/staff attacks. And any other abilities that feature “energy damage” in the tooltip. Just bear in mind that one weapon does not necessarily solely deal one kind of damage.
So your armour rating protects you against Kinetic and Energy abilities.
What Armour Does Not Protect You Against
However, there are other damage types: internal and elemental.
Internal Damages are attacks like poisons, damage over time and any ability that has “internal damage” in the tooltip description.
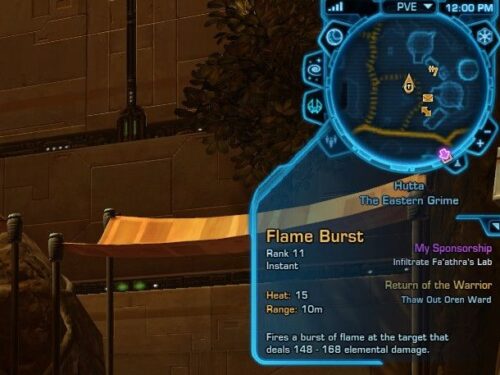
Elemental Damage, as noted in this wiki entry, generally refers to fire damage types. An example is the Powertech Combat Skill “Flame Burst”:
Armour Rating does not protect you against these two damage types.
Should I Increase My Armour Rating?
If you can, then the answer is yes – for all classes and especially Tanks. Whether you do this through crafting whole items or by increasing the rating of your Armour mods in slotted gear is your choice. It’s your first defence against many attacks.
↑ Stat List
Damage Reduction

This is probably one of the more complicated stats in my opinion, believe it or not! The good news is there’s very little you can do about it.
Passive Damage Reduction against all four damage types.
“Passive” just means you don’t need to do anything to benefit from your current Damage Reduction rating. It is also not a “roll” each time you use an ability. It just is.
What Does Damage Reduction Do?
It reduces damage taken from:
- Kinetic Attacks
- Energy Attacks
- Internal Damage
- Elemental Damage
So, whereas Armour Rating did not protect you from Internal and Elemental Damage, Damage Reduction does.
Where Does Damage Reduction Come From?
- Class Buffs Force Valor (Consular) and Mark of Power (Inquisitor) increase Damage Reduction by 10%.
- Passives in Combat Proficiencies. Examples are
- Elusiveness, granted to Jedi Shadow (Tank) at L24 (2%)
- One With the Force, granted to Jedi Shadow (Tank) at L28 (10%)
- Mental Fortitude, granted to Jedi Shadow (Tank) at L64 (2%)
- Life Surge, granted to Sith Sorcerer (Heals) at L36 (3%)
- Deafening Defence:, granted to Sith Juggernaut (Vengeance) at L56 (5%)
- Sorensu Form, granted to Sith Juggernaut (Tank) at L12 (6%)
- For Kinetic and Energy Attacks, Armour Rating adds a substantial bonus to Damage Reduction
Should I Increase My Damage Reduction?
For the most part, this should happen naturally, through Armour Rating and automatically-granted passive ability updates as you level. Tanks should consider spending Utility Points on abilities that reduce damage taken as an extra boost.
↑ Stat List
Defense (Defence) Chance

I’ve put the US and British English spelling in this one, for anyone confused by that! Defence Chance is the:
Chance to avoid incoming attacks, broken down by attack type.
The types of ‘attempted avoidance’ maneuvers are:
- Melée Parry (Force Users only, as it requires a melée weapon)
- Ranged Deflect (Force Users only, as it requires a melée weapon)
- Dodge (Non-Force Users Only)
- Resistance (Force and Tech attacks)
If you avoid an attack, it misses you completely. There’s no partial avoidance stat (which there is in LOTRO, incidentally).
Where Does Defence Chance Come From?
- Defence Rating Enhancements or Gear
- Combat abilities, such as the Smuggler’s “Dodge” skill.
- You may have a ‘base’ Defence Chance. My Gunslinger has a 5% base, for example.
- Passives earned in Combat Proficiences, such as Shadowsight (L60, Shadow Tank)
Should I Increase My Defence Chance?
- Tanks: Heck yes. The more damage you avoid the less your group members or companions have to work. Staying alive is as much your responsibility as the healer’s!
- DPS and Non-Force Healers: 99.9% of you shouldn’t even bother to do anything on top of your base level. If you’re interested in a non-standard build, tap the link below to see what I sometimes do with Defence Chance.
- Healers: No. The likelihood of actually benefiting from a parry or deflect chance is minimal. You’re better healing yourself and others better. Force Healers cannot dodge either. And Sith Sorcerers, for example, have Static Barrier and Force Barrier as temporary defences anyway.
Using Defence Rating when not a Tank
Here’s the thing. If you’re a Solo player and find some content really difficult – e.g. KotFE/KotET, then I’ve employed a different strategy on the odd occasion.
Why? Non-Force Users can dodge some attacks. DPS Force Users can parry and deflect shots and slashes. If you’re struggling on a difficult part of Solo content, create a build that’s designed to outlast your foe rather than take them down quicker.
- How to Do It: Use Mods or Augments that grant Defence Rating, instead of, say, Power. Though I think some augments have both Power and Defense Rating. There will be a DPS loss but resilience increase.
- Another Way: If you’re DPS and your class has a Trait Tree that has Tank in it, you can equip a shield. Then build tank-like gear for the tough fights. You’ll deal less damage (as you don’t have a focus or generator) but you keep your damaging abilities.
- How Not to Do It: Don’t use Augments that feature Shield Chance or Absorption, even if they feature Defence. You’re wasting stats on things you cannot use.
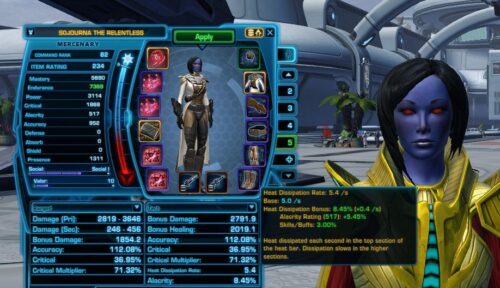
I’m even doing this to create a “Balanced” DPS Sith Warrior during the class story. Here’s an example from her stats while on Hoth:
↑ Stat List
Endurance & Health

Endurance increases the amount of damage (Health) you can suffer before being defeated.
This is, to use old gaming terms, your “Hit Points”. Once this reaches 0, you will be defeated.
How Endurance Affects Health
A quick calculation shows this, using my L27 Jedi Shadow:
- Health: 4914, Endurance: 401
- Therefore, for this character, 1 Point of Endurance gives 12.25 Health Points
Other Levels and Classes
- L10 Scoundrel: 2045/176 = 11.62 Health/Point of Endurance
- L32 Operative: 6697/551 = 12.15 Health/Point of Endurance
- L59 Sith Juggernaut: 27343/2083 = 13.13 Health/Point of Endurance
- L70 Sith Sorcerer (240 Gear): 120260/7943 = 15.14 Health/Point of Endurance
- L70 Jedi Shadow (235 Gear): 107686/6906 = 15.59 Health/Point of Endurance
So interestingly, the higher level your character is, the more Health you receive per Endurance. There may be a difference in this calculation from Heavy Armour to Light Armour, but I don’t know that without having more time to compare. But technically my Shadow is in lower-rated gear to my Sorc, but receives a better ratio. Whether this is related to armour class, or combat role I don’t know.
Health Regeneration
There is a small number when you hover over Endurance in the Character Panel called Health Regeneration. This is how quickly you recover lost Health out of combat.
Regeneration Rate

Regeneration relates to the percentage bar underneath your Health bar next to your character avatar and how fast it regenerates in and out of combat. What this represents depends on your character’s base class:
- Force Users: Force
- Troopers: Ammunition
- Agents and Smugglers: Energy
How to Regenerate Faster?
- Passive Abilities: e.g. One with the Force, Jedi Shadow (Tank) earned at L28 (30%)
- Increasing Your Alacrity
- Some foods bought from cantinas can improve your regeneration rate.
- Some combat abilities boost the level of your resource.
Should I Improve my Regeneration?
If you’re a healer or DPS, as with Alacrity, keeping your combat resource is needed. But there’s little you can do about it besides the Alacrity change, when in-combat.
For out-of-combat regneration, your class’ healing ability will refill this much quicker than waiting. And, if you want to show off, Cartel Market toys often do the same.
↑ Stat List
Heat Dissipation Rate (Bounty Hunters only)

Heat management can be a tricky thing for Bounty Hunters. Instead of trying to keep a resource full, Bounty Hunters need to keep their Heat bar down. The Dissipation Rate governs how fast your equipment cools down. If you overheat, or don’t have enough heat % left for an ability it will lock out until you’ve cooled down enough.
Heat Dissipation is Not Linear
Unlike Force, for example, Heat rating cools slower the hotter your equipment is. I’ve seen pointers in various places about trying to keep heat to below 40% as it dissipates slower above this percentage.
As with Regneration, it depends on passive abilities and Alacrity. However, when I had an Alacrity of >110% I had overheating issues in long combats due to churning out more heat-generating abilities faster. But, as I said earlier, other players thought it was likely my rotation rather than my stats that was at fault.
Vent Heat
You can use Vent Heat to dissipate 50% of your heat over 3 seconds. This has a cooldown of 2 minutes before any Alacrity reductions, so cannot be used often even in longer fights!
Whether you try to improve this, or focus on your rotation (bettter than me!) better is really your call!
↑ Stat List
Shield Chance & Shield Absorption

As well as Defense Chance, Shield Chance and Absorption are key to Tank classes – and can therefore be ignored if you do not carry a shield!
- Shield Chance: this is the probability of your shield absorbing some damage from an attack. And by “Attack” I mean Kinetic/Energy and not Internal/Elemental Damage
- Shield Absorption: the proportion of an attack’s damage that does not hit you when the ‘dice’ roll in your favour.
How To Improve Your Shield and Absorption Ratings
Apart from specific class passive abilities, your only ways are:
- Equip a Shield and not a Focus/Generator: Shields have a base 5% Shield Chance and 20% Absorption.
- Through your gear, either by crafting/earning whole pieces or through crafting/purchasing Enhancements that feature these two stats.
- Additional Combat Abilities also grant temporary boosts. e.g. Kinetic Ward (Jedi Shadow) that starts with a 15% Shield Chance boost and gradually reduces.
Shield Rating or Absorption Rating?
Well both – you want give yourself the best shot at the shield working for you (Chance) and soak as much as possible when you do (Absorption). How you choose when gearing is trickier to explain. In the base game you can make it up as you go along. Once you reach Knights of the Fallen Empire or if you do group flashpoints or operations you should be more intentional. I’ve put some calculations in the box below if you want to go deeper on this!
Maths Gymnastics – a Basic Example
When levelling, or gearing, it can often feel like you have to choose whether to improve shield rating or shield absorption. Or one has a lesser increase than the other. In this situation it can be helpful to be reminded of the basics of probability in Mathematics.
Answer by Calculation
Say you have a Shield Chance of 20% with an Absorption Rating of 10%. This gives you an effective damage absorption of 2% (20% × 10%). If your next Enhancement mod could make it 25% Shield Chance or an Absorption Rating of 15%, you choose based on maths.
Example 1
- Shield Chance 20% × Absorption Rating 15% = Effective Damage Soaked: 3.75%
- Shield Chance 25% × Absorption Rating 10% = Effective Damage Soaked: 2.5%
In this case it is better to have a lower probability of soaking damage because when you do, you soak up more damage.
Example 2
What if the Enhancement granted 10% Shield Chance or 5% Absorption?
- Shield Chance 30% × Absorption Rating 10% = Effective Damage Soaked: 3.0%
- Shield Chance 20% × Absorption Rating 15% = Effective Damage Soaked: 3.75%
Again, although the gap has closed, the lower probability is still outweighed by the amount of damage you do soak up when the dice are rolled in your favour.
Experiment
Getting the “right” answer may involve crafting or purchasing different Enhancements (or Augments if needs be) and working through the calculations. This isn’t ideal if you’re credit-poor. But even if you’re soloing with a healing companion, the more damage you can soak, the easier your healer’s job becomes. And the higher your companion influence, the more time they could dedicate to dealing damage rather than healing you. In group scenarios, it is the healer’s job to keep you alive but you should do your part in making their task as simple as possible.
↑ Stat List
TL;DR Character Combat Stats in SWTOR Summary
Your stats may be complicated, but they govern how difficult you find combat. If you’re just running the class story, you can be chilled about this, but it is also a great time to experiment. I’m not an expert on the intricacies of the maths here – and my knowledge on ‘optimising’ for Operations is nearly non-existent. But if you’re a beginner to SWTOR, I hope this guide to SWTOR combat stats gives you a good idea on where to start. As upgrades cost credits and/or time, saving credits, especially as an Free-to-Play character matters. But at the end of the day, it’s important to enjoy playing the game, not worrying about a 1% here or there!
